This guide makes it quick and easy to set up the software so that the transaction goes as smoothly and comfortably as possible.
In order to use e-Financials, a legal representative must first sign the usage contract. The software can be used by public limited companies, private limited companies, commercial associations, limited partnerships, general partnerships, non-profit associations, European Company representatives and the sole proprietors (FIE).
In order to sign the contract, one must enter the e-Business Register Portal with a Personal Identity Card or with a Mobile-ID at https://ariregister.rik.ee and choose "Other Services" and “e-Financials” from the main menu. In the following view, an entity must be chosen from the “My entities” list by clicking on the button “Proceed to sign the contract”. In the next view the contract can be signed.
After signing the contract, the software is ready for using. In order to make the usage more comfortable, three modules must be configured: settings, billing and personnel.
Choose from the Settings menu >
- General settings
- Program settings – it is possible to set the number of rows per page, activate additional functionality, display of doubtful and hopeless invoices on workspace and the number of days due, after what the invoice can be marked as doubtful or hopeless, accepting e-invoices, activating other functions and modules.
- Invoice data – it is possible to choose the default sales invoice template, enter entity’s contact information, e-mail and edit Balance confirmation template.
- Logo on the invoice – it is possible to upload a logo file. The maximum resolution is 300 x 100 px. It may be in PNG or JPG format.
- Invoice number series – it is possible to create invoice series, that help to keep track of different invoices.
- Bank accounts – it is possible to add entity’s bank accounts. By default all accounts are displayed on sales invoices but accounts can be untagged. If an entity has more than one bank account, the default account for compensation payments needs to be selected. Credit limit can be added to bank accounts
- VAT number and the Tax and Customs Board reference number information – it is possible to see entity’s VAT number and the reference number for the Tax and Customs. The VAT number will be filled in automatically if the entity had registered the VAT liability.
- Setting up the chart of accounts
- Edit the chart of accounts – accounts can be activated and deactivated. The software is set up for a regular small business and only some accounts are activated by default. Accounts can be chosen for incoming/outgoing transactions
- Sub-accounts aka dimensions – sub-account for the accounts can be created by clicking “Add a new sub-account
- Compensation types – it is possible to deactivate compensation types not being used.
- Edit invoice templates – it is possible to deactivate invoice templates not being used.
- Active currencies – it is possible to add currencies for creating invoices in other currencies.
- Set up the initial balance – it is possible to set up the initial balance by choosing one of the following:
- “Add the initial balance of 100% monetary contribution“
- “Add the initial balance of a non-contributory OÜ”
- “Add the initial balance manually”
By default the software offers an option how the company was registered (with or without monetary contribution). The entity must make the choice depending on the equity contribution payment. The third choice allows to change the initial balance manually.
When entering an initial balance for an operating entity, it is recommended to enter the account balances from the beginning of a fiscal year and then add correcting entries to make it current. After that the correct accounting reports are generated. - VAT registrations – it is possible to add VAT registration if the entity is VAT liable. The software does not calculate VAT unless VAT nr has been added. The VAT registration space will be filled in automatically if the entity is liable to VAT.
- Locked periods – it is possible to lock periods in the past where no entries can be added. Locked periods can be unlocked by clicking „Delete“
- Contract information – it is possible to download the e-Financials contract and end the e-Financials contract. All created entries and saved invoices can be downloaded from here.
- Authorized persons – it is possible to grant people authorizations to access an entity in e-Financials. Only entity’s legal representatives and people with an authorization to authorize new users, may authorize new users. Authorized users can have many different rights that can be chosen.
- Access for support – it is possible to authorize Client support for access. Authorization is granted for a limited period and it can be deleted before it expires.
Choose from the Billing menu >
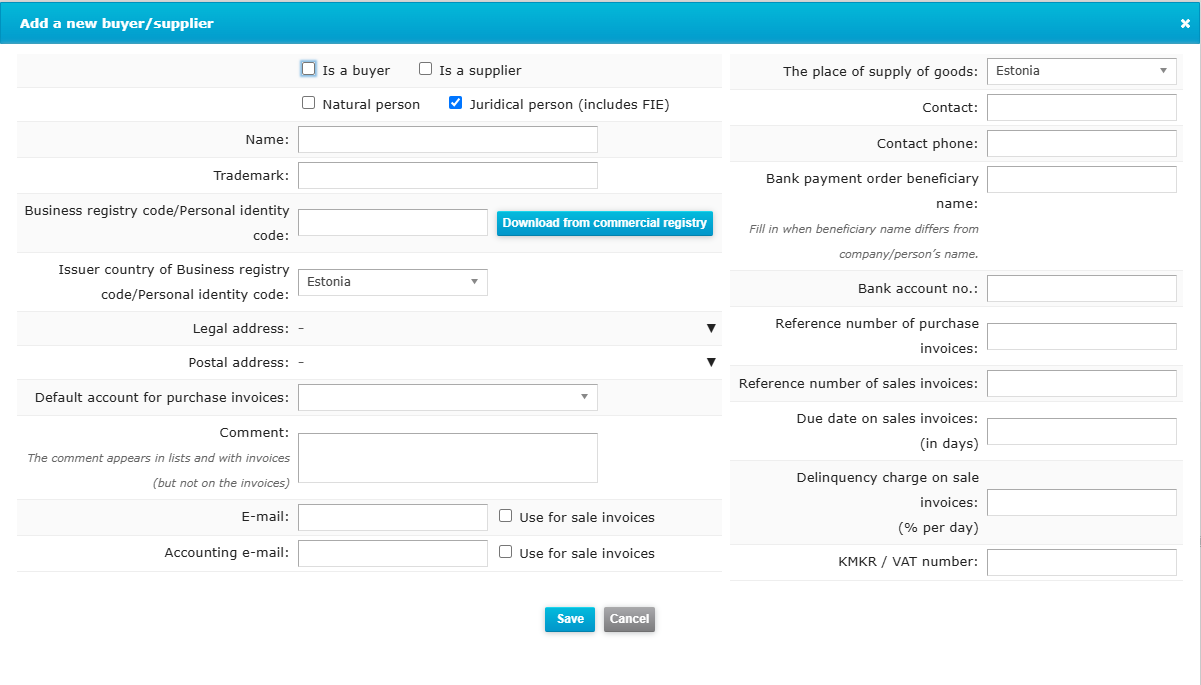
- . Buyers/Suppliers > Add a new buyer/supplier – in order to create a new invoice, a buyer or a supplier must be added in the “Add a new buyer/supplier” window. In case the buyer/supplier is an Estonian company, it is possible to download all the contact information by entering registry code and clicking “Download from the commercial register”. If the entity is not registered in Estonian Commercial Register, the information must be entered manually.
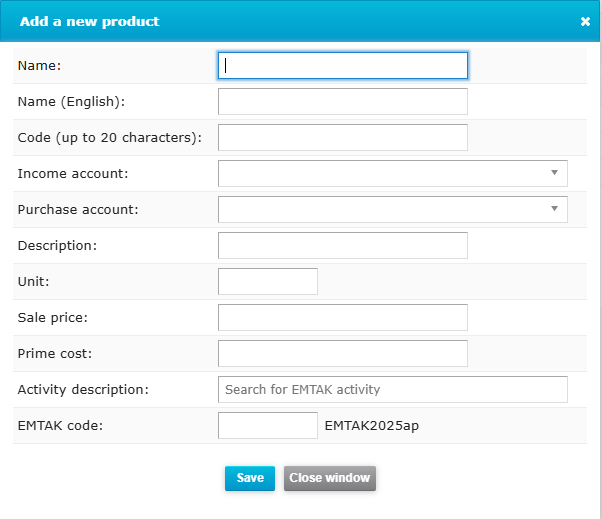
- Products/Services > Add a new product – it is possible to add a new product or service. All the necessary fields must be filled in in the following window.
Choose from the Personnel menu >
- Persons > Add a person - it is possible to add employees or other persons to whom payments need to be mad. It is necessary to fill in all the relevant fields in the opened window:
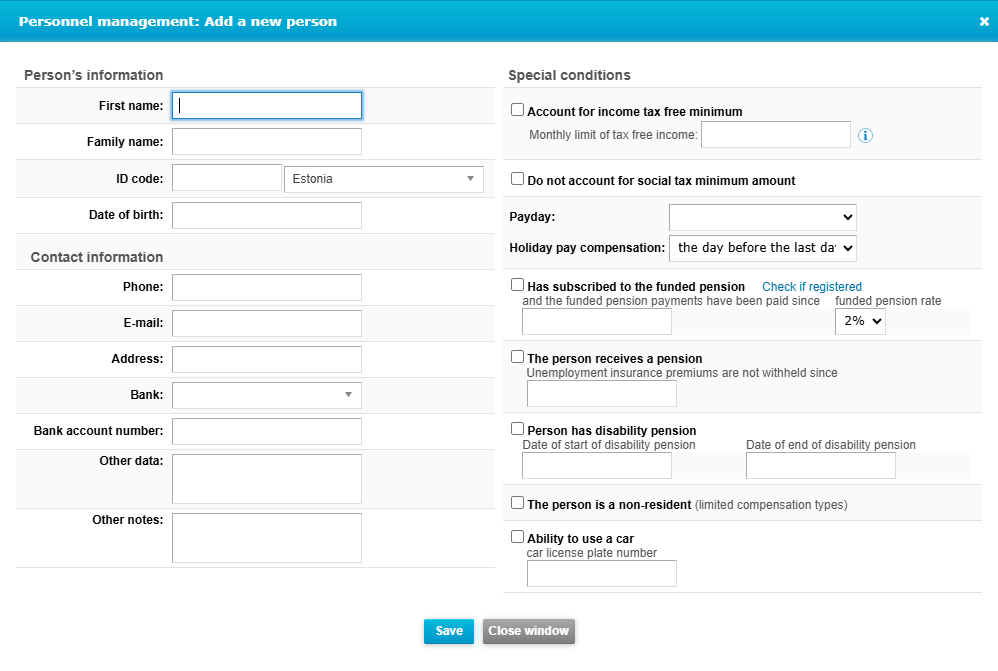
- Person's information – person’s first name, family name and ID code must be filled out. If the person has Estonian personal identity code, , the date of birth will be filled out automatically. If necessary, select a country, the default is Estonia.
- Contact information – user may add additionally address and phone number. Payment notices can be sent to persons s e-mail address. Bank account number is used for compensation payments. If the bank account has not been added, no bank payment order is generated.
- At special conditions it must be chosen, if the software calculates the Income tax free minimum or it does not. Income tax free minimum may be calculated cumulatively (the remaining annual income tax free sum is used).
Do not account for social tax minimum amount – this must be chosen if the entity does not account for the social tax minimum amount for the person.
Payday is the date when the bank payment order for the compensation will be filled.
Holiday pay compensation can be paid after the holiday with the next compensation payment or on the last working day before the holiday. In the first instance - paying with the next compensation payment – the program calculates the compensation and the period (if the payouts have been entered at least in the six previous months). In the second instance, the compensation can be entered manually.
Persons who have been required to sign up to the funded pension will be automatically marked as “Has subscribed to the funded pension” based on their ID number. Those signed up to funded pensions voluntarily, must be marked accordingly manually. It is possible to check whether the person has subscribed to the 3% or 2% savings rate under the “Sign-up control”. NB! The correct savings rate must be marked when entering data about previous periods.
When a person has retired, it is possible to mark the field “The Person receives a pension” and add a date in the field below from which onwards the unemployment insurance tax won’t be no longer met.
When marking the field “The person is a non-resident”, payment options meant for non-residents show up when adding a contract.
Ability to use a car it is possible to add a car number that will be displayed under the person`s page.
Other data it is possible to add other necessary data.
The Person Page display after saving data:- It is possible to change the person`s data by clicking on “Change person`s data”
- It is possible to add a contract by clicking “Add a new contract” Adding the current agreement is necessary for adding payments.
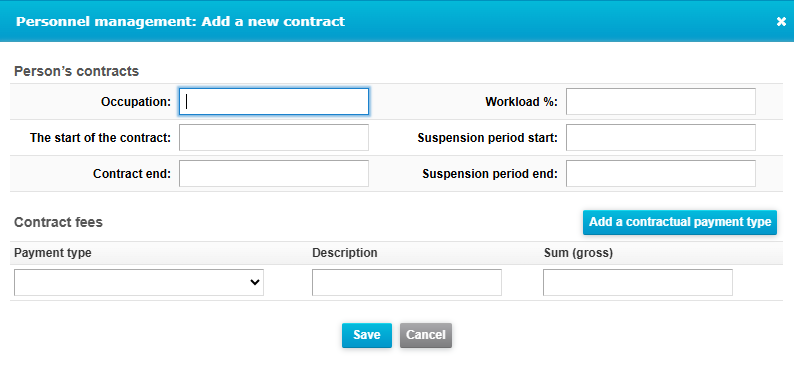
In the displayed window, it is possible to fill in information about: the position, the start and end of the contract, workload%, suspense start/end, payment type and sum (gross). The entered gross sum will be used by the software for calculating compensation payments.
Delete the person – it is possible to delete the person when no contracts have been added, no payments or other transactions have been made. When a person has a contract and/or payments, it is possible to only mark the person as “inactive”.